Prerequisites
Dynamis - Windurst
| Rank 6 |
|
| Beastmen Stronghold Goblin | Perpetual Hourglass |
| Monster | Key Item |
| Tzee Xicu Idol | Hydra Corps Lantern |
| Capacity | 64 Members |
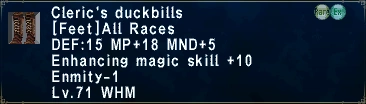
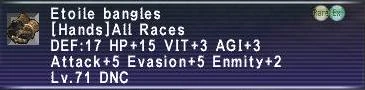
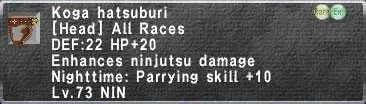
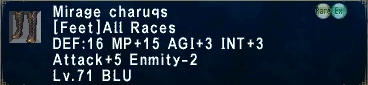
Drops
 |
|
 |
|
 |
|
 |

|
 |

|
 |
|
 |
|

|
Maps


Strategy
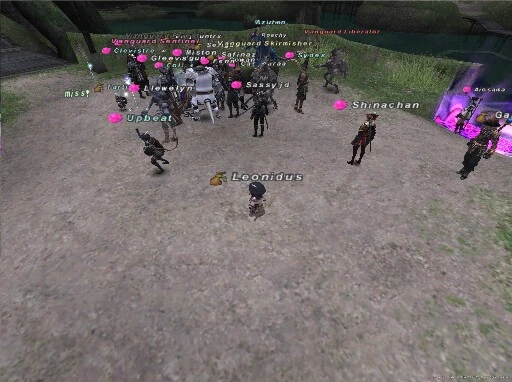
Move Forward until you reach AH, Pull the front part of the AH till you get the Time+, Move towards Shantotto's House and clear it out, Sac the MNK to the top of her house and double back to the AH island, Clear the bridge to the West. Clear out the next small island, and bridge going to Heaven's Tower. Hug the wall to get back Death house, and move up the ramp, pull the next bridge between BLM and SMN house. Sac pull BLM while simultaneously killing the 110 stat for some more time. Sac Pull SMN and head back to Heavens Tower, clear teh bridge and either kill the repops near the start of the bridge or don't. Head to mnk island and Sac pull RDM, then the boss. There you go! all there is the windy with next to no detail. (i recommend invincible for the MNK NM).
Pulls
Assuming your going to pull the Bare Minimum of Windurst:
| Pull # | |
| 001-003 | Nice and Slow should be able to manage |
| 004-006 | Have BLM's ES AoE 005 to kill it fast, you'll get a couple of MNK's on this pull |
| 007 | Don't aggro this stat while still fighting 004-006, only makes this complicated, hes just around the corner of the tent |
| 008 | Easy enough, pops 4 mobs, take them down. Your mages may be low on mp but 008 is an MP stat so just push a bit further. Time +20 |
| 009 | Pops mobs on 008's section of the bridge be ready to take them out |
| 010-011 | 011 pops 2 BSTs |
| 012-015 | pull 012 when 013 turns towards the north, get 013 at the southernmost point of his walk, 014&015 come at the same time |
| 016 | 2 SMNs 1BLM |
| 017-019 | Big pull, pushing 7~11 mobs, can be pulled individually but extremely difficult. 018 Time +20 |
| 029&030 | 4 mobs per stat |
| 031 | 1 SMN be ready! Time +10 |
| 032&033 | 032 pops 033, totals 6 mobs 2 stats |
| 034 | 2x BST |
| 035-037 | 035 pops 036&037 only about 2 mobs, but 3 stats. 036&037 spawn at the bridge so have puller be aware to run though stats otw back |
| 038-045 | Nothing exciting, 041 Time +20 |
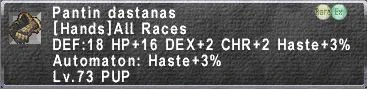
| 046-MNK | Sac pull 046 to 045's position, pull MNK back to 040's position, Ls should be waiting at 040's position for MNK NM. |
| 058-064 | BLMs >4 Timed Nuke 058 Single, AoE nuke 060, pops 1 BST, AoE nuke 063, pops one DRG |
| BLMs <4 pull 058 back to LS at 029, have puller kite all stats while blms work on one at a time, watch out for silencega | |
| 065-068 | on 066 either pull nuke 066 down at start and clean up, or just pull it, kinda big pull, dont pull thinking its no big deal. |
| 108&109 | Timed AoE nuke these, 1 WAR mob pop |
| 089-092 | Repops for this happen at the end points of the bridge, be ready to kite the 3 stats on initial pull. |
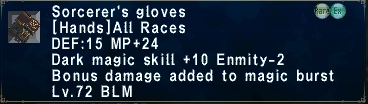
| 084-BLM | Sac pull 085 down to ~075's position, be careful 085 pops blms that can bind or sleepga your sac puller, silence pull BLM back to LS |
| 101 | During BLM sac (since you don't need blms), send BLMs to kill 101, make sure they warp out as soon as 101 dies, also make sure they have RR |
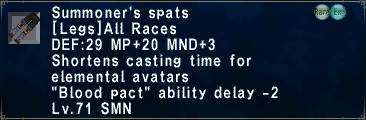
| 093-SMN | While BLMs are otw back, Sac pull 093 to 045 heading East. have 2 people ready, one grab SMN other grab SMN avatar (almost always Ifrit) |
| 110-112 | When BLM's recover (10min weakness for re-enter) AoE nuke 110&111, 112&113, 2 wars pop. |
| 119&120 | ONLY if you have >35mins should you pull these, have someone pop 117 and die, AoE nuke 119&120, 6 mobs pop |
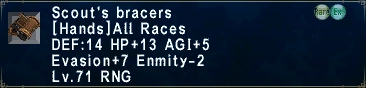
| 116-RDM | Sac 116 to 007~009, you can go further but the reset takes longer. LS waiting at 035 for RDM NM, have tank waiting at 029 for RDM |
| 121 | Pull 121 to 065's position, Grab big stat at 030 and head back to ls at 035 |
Mob Order
Yagudo are unfortunately one of the rougher beastmen to fight. With AoE stun they can get quite annoying at times. Same old Order except your NM's are mostly pulled completely separately from everything else making taking them out relatively easier than Quadav Goblins or Orcs.
Mob order is as follows SMN > BST > BST's pet > BLM, RNG, RDM, BRD > SAM, WAR, DRK, DRG > PLD & THF > DRG Wyvern > NIN > MNK > WHM
Mob Names: NOTE: All Monster's have the Prefix Vanguard, thus it will be ignored in the table
| Jobs | Name |
| BST | Ogresoother |
| WHM | Priest |
| PLD | Exemplar |
| DRG | Partisan |
| SAM | Persecutor |
| NIN | Assassin |
| RNG | Salvager |
| MNK | Sentinel |
| BRD | Chanter |
| RDM | Visionary |
| THF | Liberator |
| BLM | Prelate |
| SMN | Oracle |
| DRK | Inciter |
| WAR | Skirmisher |